
Keeping your Dyson V8 clean ensures optimal performance and longevity. Regular maintenance involves cleaning filters, clearing blockages, and replacing worn parts. Follow these easy, safe steps to keep your vacuum in top shape.
Proper cleaning not only maintains suction power but also extends the life of your device. Use recommended attachments for hard-to-reach areas and replace filters as needed for best results.
Gather Necessary Supplies
- Microfiber cloth or soft brush
- Pre-filter replacement (if needed)
- Crevice tool attachment
- Water and mild detergent (for filters)
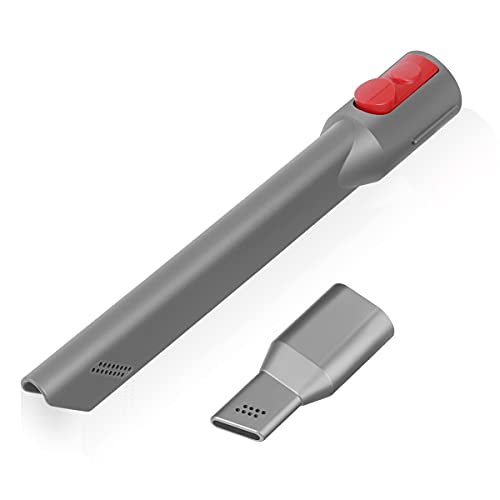
LANMU Crevice Tool Vacuum Attachments Compatible with Dyson V15 V12 V11 V10 V9 V8 V7 Gen5 Outsize Vacuum Cleaner, Narrow Nozzel Replacement Parts for Hard-to-Reach Space
Wide Compatibility: This crevice tool attachment is compatible with V15 V12 V11 V10 V9 V8 V7 Gen5 G5...
As an affiliate, we earn on qualifying purchases.
Turn Off and Unplug Your Dyson V8
Before starting, ensure the vacuum is turned off and unplugged from the power source to prevent any electrical hazards or accidental activation.
Clean the Filter
- Remove the filter from the vacuum according to the manufacturer instructions.
- Rinse the filter under cold water until the water runs clear.
- Let it air dry completely—preferably overnight—before reinstalling.
Clear Blockages and Debris
Use the crevice tool attachment to reach into tight spots, including the wand, brush bar, and air pathways. Remove any visible debris or tangled hair carefully.
Clean the Vacuum Body and Brush Bar
- Wipe the vacuum body with a damp microfiber cloth to remove dust and dirt.
- Check the brush bar for hair or debris. Remove tangled fibers and clean it with a soft brush if needed.
Reassemble and Test
Once all parts are dry and clean, reassemble your Dyson V8. Turn it on briefly to ensure everything functions properly.
Products That Help

LANMU Crevice Tool Vacuum Attachments Compatible
- ✔ Compatibility: Dyson V8 and similar models
- ✔ Material: Plastic
- ✔ Design: Narrow, flexible
LANMU Crevice Tool Vacuum Attachments Compatible
This versatile crevice tool attachment is compatible with Dyson V8 and other models, making it ideal for cleaning tight corners, sofa cushions, and car interiors. Its slim, flexible design enhances reach and precision.
Pros:
- Narrow nozzle for tight spaces
- Compatible with multiple Dyson models
- Flexible and easy to maneuver
- Durable build
Cons:
- Requires additional tools for some tasks
- Not suitable for V6 or canister models
Best for: Cleaning corners, upholstery, and car interiors
Not ideal for: Heavy-duty deep cleaning or large debris removal
Bottom line: A practical, versatile tool for reaching tight spots efficiently.
Frequently Asked Questions
How often should I clean the filters on my Dyson V8?
It is recommended to rinse and dry the filters every 1-3 months, depending on usage, to maintain optimal suction.
Can I wash all parts of my Dyson V8?
Most filters and certain attachments can be washed with water. Avoid immersing the motor or electronic components. Always follow the manufacturer’s cleaning instructions.
What should I do if my vacuum is losing suction?
Check and clean the filters, clear any blockages, and inspect the brush bar. Replacing filters or attachments might be necessary if performance does not improve.
Is it safe to use water to clean the filters?
Yes, if the filters are washable. Rinse them thoroughly and ensure they are completely dry before reinstalling to prevent damage or mold growth.
Affiliate disclosure: As an Amazon Associate we earn from qualifying purchases. Prices and availability are accurate as of the time of publishing.