
TL;DR
A closet rig can be surprisingly quiet with the right setup. Focus on placement, acoustic treatment, and sealing gaps to reduce reflections and noise leaks. Moving the rig into another room is often the biggest win.
Ever tried recording in a tiny closet and ended up with echoes, background noise, or worse — a room that sounds like you’re inside a metal box?
The good news: you don’t need a fancy studio. You just need to think about how sound behaves in small spaces, and how to tame it. Whether you’re voiceover work, streaming, or just want cleaner recordings, the setup is more about placement and treatment than gear alone.
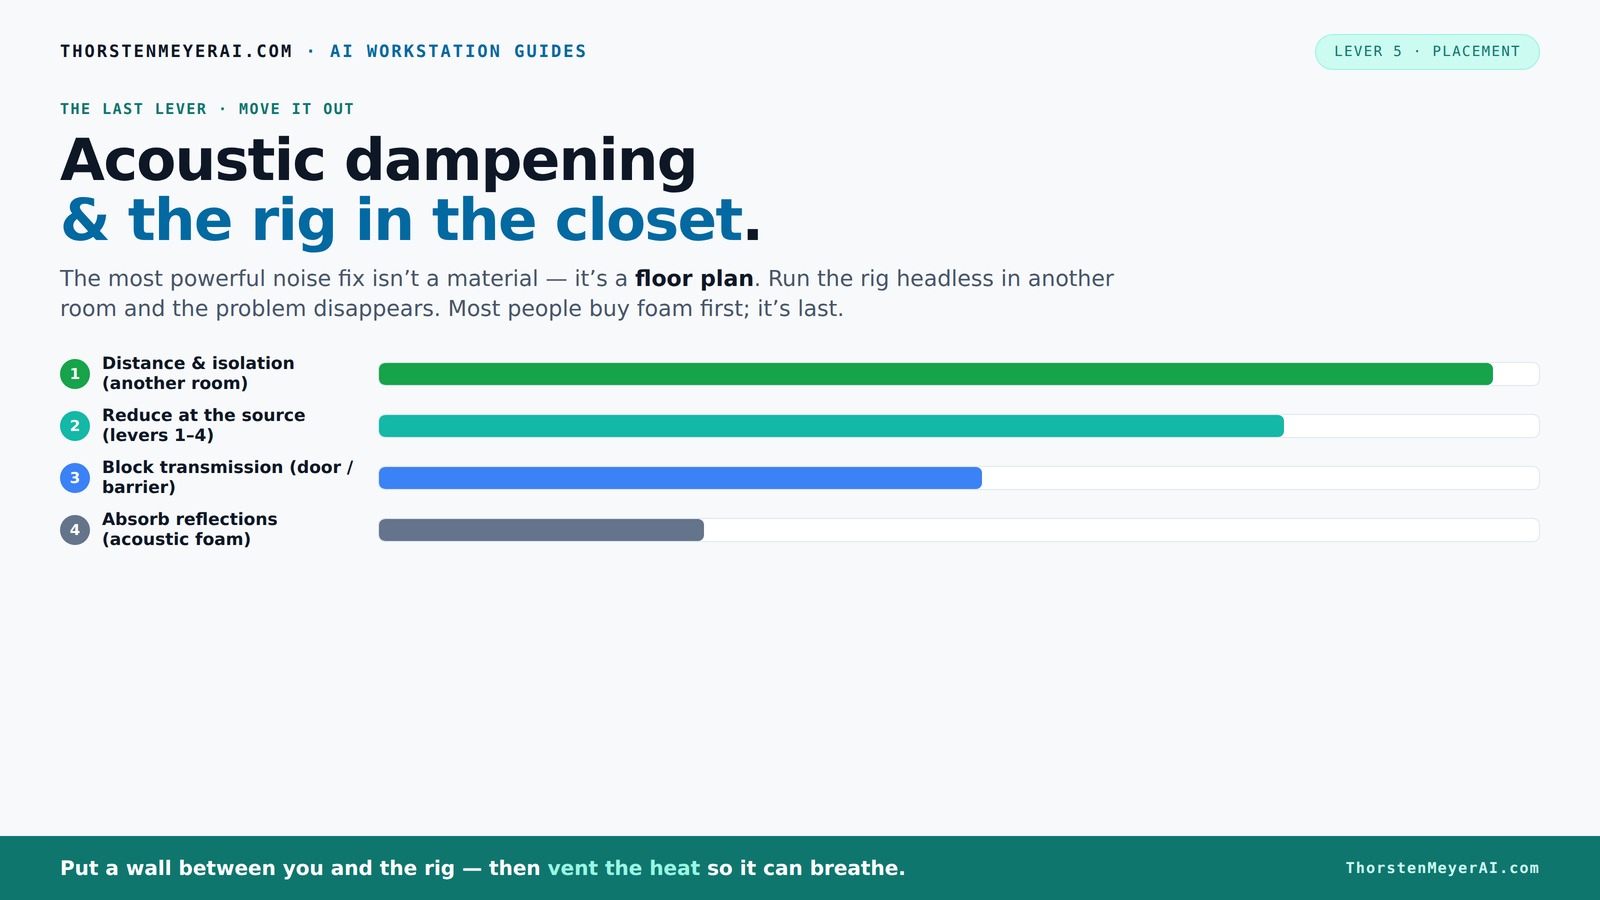
Acoustic dampening
& the rig in the closet.
The most powerful noise fix isn’t a material — it’s a floor plan. A rig you can’t hear because it’s in another room beats any amount of foam. Tap the approaches in Part 1 to see what actually works.
(another room)
(levers 1–4)
(door / barrier)
(acoustic foam)
Contain the noise, not the heat
Key Takeaways
- Moving your rig into another room or closet dramatically reduces noise and reflection issues.
- Prioritize placement and sealing before investing in acoustic foam or panels.
- Seal gaps, outlets, and door leaks to prevent sound leaks — tiny cracks make a big difference.
- Ventilation is critical in closet setups — passive vents and quiet fans keep the rig cool without noise leaks.
- Use DIY solutions like blankets, rugs, and foam panels to improve sound quality on a budget.

Focusound 52 Pack Acoustic Foam Panels 1" x 12" x 12" Sound Proof Foam Panles Soundproofing Noise Cancelling Wedge Panels for Home Office Recoding Studio with 300PCS Double-Side Adhesive
Soundproofing - Acoustic foam panels triangular grooves structure for better noise absorption, helps to reduce and absorb unwanted...
As an affiliate, we earn on qualifying purchases.
As an affiliate, we earn on qualifying purchases.
Why Your Closet Is a Reflection Monster and How to Tame It
Your closet is a tiny, hard-surfaced echo chamber. This creates loud reflections, standing waves, and low-end buildup that mess with your sound.
Think of it like shouting in a small bathroom — every sound bounces around. To fix it, focus on absorbing those reflective surfaces first. Cover walls, ceiling, and the door with foam, blankets, or rugs. Add bass traps in the corners if low-end muddiness persists.
For example, a simple 2-inch foam panel on the ceiling and a thick blanket over the door can reduce echo by over 50%, according to [1].

Soundproofing Door Seal Kit - Door Frame Gasket, Screw On Weather Stripping for Doors - Top & Side Door Jamb Weatherstrip Set - Aluminum Exterior Door Seal - 84 x 36 (Aluminum, Medium-Duty)
Acoustic Insulation That Also Stops Drafts - The Marvel Mute aluminum door seal kit blocks noise and drafts...
As an affiliate, we earn on qualifying purchases.
As an affiliate, we earn on qualifying purchases.
The Hierarchy of Noise Control: What Matters Most
Most people start by buying foam or foam panels. But that’s the last thing you should do first. Understanding the hierarchy of noise control can save you time and money.
Here’s the real order of effectiveness:
- Distance and isolation: Move the rig away from you or into another room.
- Reduce noise at the source: Use quieter fans, undervolt components, or switch to liquid cooling.
- Block transmission: Seal gaps around doors, outlets, and vents with weatherstripping or acoustic sealant.
- Absorb reflections: Foam panels, blankets, and rugs to soften sound inside the space.
This hierarchy is backed by research and saves you money and effort in the long run [1].

8 Pack - Bass Traps Acoustic Foam Corner, 8''x8''x12'' Black Bass Traps Corner Studio Foam, High Density and Fire-Proof Acoustic Panels Recording Studio Acoustical Treatments
Acoustic Principle- Bass Trap is a kind of sound absorbing structure specially used to absorb specific low-frequency standing...
As an affiliate, we earn on qualifying purchases.
As an affiliate, we earn on qualifying purchases.
How Placement Turns a Noisy Closet Into a Quiet Studio
The single biggest change you can make? Just move the rig. A rig in another room, or even a closet, is often quieter than trying to fix it in place. This simple relocation can significantly improve your sound quality.
For example, a voice actor working in a closet rig found that simply relocating her setup to a spare room reduced noise by 70%. She used a long Ethernet cable and remote access, so she never had to sit next to the noisy box.
This approach works because your computer or server handles most of the work remotely, and your microphone picks up less unwanted noise. Plus, it’s free and easy to try.
More importantly, this shift minimizes the acoustic footprint of the rig itself, reducing the need for extensive treatment—since the noise and vibrations are physically farther away from your microphone, they’re less likely to be captured. This tradeoff means less money spent on soundproofing materials and less time troubleshooting echo issues.

Sound Addicted - Studio Monitor Isolation Pads for 5 Inch Monitors, Pair of Two High Density Acoustic Foam which Fits Most Speaker Stands | SMPad 5
SMPad 5 is made out of the highest quality acoustical foam (50kg/m^3 density).
As an affiliate, we earn on qualifying purchases.
As an affiliate, we earn on qualifying purchases.
The 'Rig in the Closet' Setup — How to Vent Without Sound Leaks
Putting a high-heat, high-noise machine in a closet sounds perfect until it overheats or roars. The trick is to give it airflow without letting sound escape.
Use a combination of passive vents, ducted airflow, and quiet exhaust fans. Some DIYers install a small vent in the closet door, then connect it to a fan with ducting. This setup keeps the heat out and the noise in.
For example, a streamer used a $50 quiet exhaust fan and a cardboard duct to vent her closet rig. It kept her room cool and quiet, even during long sessions [3].
Check out detailed DIY venting tips and commercial soundproof cabinets that do the cooling and noise suppression for you.
Effective ventilation is crucial because overheating can cause hardware failures or reduce performance, which impacts your workflow. Conversely, poor soundproofing of vents can turn a quiet setup into a noisy one, defeating your efforts. Striking the right balance requires understanding airflow dynamics and using sound dampening materials within the ducting and vent openings. This ensures your rig stays cool without compromising your sound isolation.
Treat the Key Surfaces: Walls, Ceiling, and Door
In a tiny space, hard surfaces are the enemy. They reflect sound and create muddiness. Covering them with absorption materials makes a huge difference.
Start with the walls behind the mic and your reflection points. Use foam panels or hanging blankets. For the ceiling, lightweight acoustic tiles or foam work well.
The door is often overlooked — a heavy blanket or acoustic sealant around the frame reduces sound leaks. Rugs on the floor also help tame reflections and lows.
For example, a streamer added a thick rug and foam panels, and her vocal clarity improved noticeably. The room no longer sounds like a cave.
Proper treatment of these surfaces is critical because they directly influence the room's reverberation time and clarity. The goal is to minimize early reflections that can cause comb filtering and muddiness, which obscure your voice’s natural tone. For more on acoustic treatment, see this guide on targeted acoustic treatment.
Corners and Bass Traps — When You Should Use Them
Corners are low-frequency trouble spots. If your closet has a boomy, muddy sound, bass traps can help.
Place foam or rockwool bass traps in the corners, especially where walls meet or in the ceiling corners. For small closets, 4-inch thick traps are a good start.
However, in tiny spaces, bass trapping often has diminishing returns. Use your ears — if the low-end still sounds uneven, add traps. Otherwise, focus on other treatment areas.
According to [4], in small booths, bass traps are less critical unless low-end buildup is obvious.
Understanding the tradeoff is key: bass traps can take up space and may not significantly improve sound if the low frequencies are already well-controlled by placement and absorption elsewhere. Over-trapping can lead to a boxy sound, so use them judiciously and evaluate the impact carefully.
Gaps, Outlets, and Doors — Seal Them All
Sound leaks through every crack and gap. Outlets, door gaps, and light switches are sneaky sound escape routes.
Use weatherstripping, acoustic sealant, or draft stoppers around doors and windows. Cover outlets with foam gaskets or outlet sealers.
This step costs almost nothing but can cut out significant noise bleeding into or out of your closet.
A streamer sealed all gaps around her closet door with weatherstripping and saw a 30% reduction in background noise [6].
Sealing gaps is a fundamental step because even tiny cracks can act as pathways for sound to escape or enter. This not only reduces noise pollution but also enhances the effectiveness of your other treatments. The tradeoff is that some gaps are hard to seal completely—like outlets or ventilation ports—so choosing quality materials and proper application maximizes your results. Remember, an airtight environment is the foundation of good sound isolation, making your other efforts more effective.
DIY Solutions for a Quick, Cheap Closet Rig Makeover
You don’t need fancy gear to get good results. Use blankets, rugs, foam panels, and reflection filters. Hang blankets from curtain rods or attach foam with thumbtacks.
For a quick fix, place a thick blanket over the door and a few foam panels on the walls. Add a rug under your chair to absorb reflections from below.
This approach is cheap, reversible, and effective for voiceovers and streaming. A recent trend shows creators combining multiple DIY methods for a balanced, effective setup.
Check out [2] and [3] for creative ideas and tutorials.
While DIY solutions are excellent for immediate improvements, understanding their limitations is key. They are often less effective at fully isolating sound than professional treatments, but they offer flexibility and cost savings. Combining multiple DIY methods—like layering blankets, foam, and placement strategies—can significantly improve sound quality without breaking the bank. The tradeoff is that these methods may not eliminate all noise leaks, especially at lower frequencies, but they are an accessible starting point for most creators.
Frequently Asked Questions
What is the difference between acoustic dampening and soundproofing?
Acoustic dampening reduces reflections and echo inside a space, making it sound clearer. Soundproofing blocks sound from entering or leaving the room, preventing noise leaks. They work together but serve different purposes.Do I need foam panels, blankets, or both?
Both help, but for different reasons. Foam panels absorb sound reflections, improving tone. Blankets and rugs also absorb reflections but are more versatile and easier to DIY. Combining them gives the best overall result.Where should I place acoustic panels in a closet vocal booth?
Focus on the wall behind the mic and the first reflection points — typically the side walls and ceiling. Covering these areas minimizes echoes and flutter echoes that muddy your recordings. Proper placement ensures that sound waves are absorbed where they tend to bounce most, preventing early reflections that can color your recordings and reduce clarity.How do I position the microphone for the best sound?
Place the mic away from reflective surfaces and aim it at the mouth, not the wall. Use a reflection filter or foam panel behind the mic to cut down on room noise. Proper positioning reduces unwanted room sound, ensuring a cleaner, more professional recording.Should I treat the wall behind the mic or behind me?
Treating the wall directly behind the mic is most effective because it minimizes early reflections that can muddy your sound. Reflective surfaces behind you mainly add room ambiance, which can be minimized with absorption. Prioritizing the area behind the microphone ensures your voice is captured clearly without room coloration.Conclusion
Turning a closet into a quiet, professional-sounding rig isn’t magic — it’s about smart placement, sealing leaks, and treating key surfaces.
Think of it like tuning a musical instrument: the right setup makes all the difference. The goal isn’t perfect silence, but a space where your voice shines without distracting echoes or background noise.
Start small, focus on sealing and placement, then layer in absorption. Your perfect closet rig is within reach — and it’s easier than you think.